> For the complete documentation index, see [llms.txt](https://docs.verifone.com/llms.txt). Markdown versions of documentation pages are available by appending `.md` to page URLs; this page is available as [Markdown](https://docs.verifone.com/adk-os-platform/readme/developing-applications/preparing-development-devices.md).
# Preparing Development Devices
## Preparing Development Terminals
### APP-DEV device
For application development Verifone recommends the use of devices converted to application development mode (APP-DEV). See details on system modes in the [system overview](/adk-os-platform/readme/system-overview-and-architecture.md).
These terminals enable use of default signature for applications and also provide test warrantied keys that can be used to load sample and test VRKv2 key packages.
{% hint style="info" %}
**APP-DEV Devices**
Application Development (APP-DEV) devices can be ordered separately from Verifone.
{% endhint %}
### Loading Test Keys
APP-DEV devices come with pre-loaded test warrantied keys. The status of those can be checked in Security Control Panel in the submenu Keys → Key status.
To load VRKv2 key packages the Security Control Panel can be used, this time with the Keys → "Load Payment Keys" submenu. To get the keyfiles loaded, copy the JSON files to a FAT32 formatted USB flash drive and plug it into the USB port of the cable. The stick gets auto mounted by the device and the "Load Payment Keys" menu will list all available key files for installation. Install them by simply selecting one from the list.
For a more comprehensive instruction see the chapter on "Customer Keys".
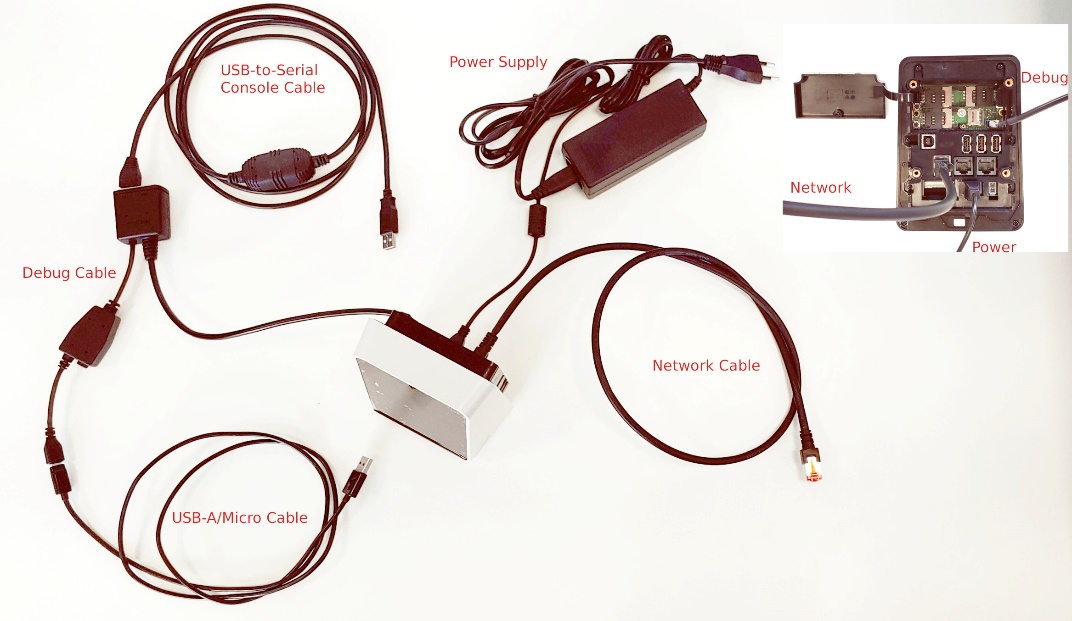
### Device Cabling P630
| **Cable** | **Use** | **VFI vs. Standard** | **Where to connect** |
| ------------------------ | ------------------------------------------- | --------------------------------- | ---------------------------------------------- |
| Adapter and debug bridge | Any connection | Verifone | To the device |
| USB-Mini-B <->Type-A | QDL Flat image loading, fastboot connection | Standard | USB Mini-B on debug bridge to USB type-A of PC |
| Ethernet | Netloader, any eth connection | Standard | Eth on debug bridge to network plug |
| USB-RS232 adapter | Console logs | Verifone
P/N 24805-02-R
| RS232 plug on debug bridge to USB type-A of PC |
| Power supply | Powering the device | Verifone | Power connector on debug bridge |
%20\(1\).png?alt=media)
### Device Cabling M425/M450
| **Cable** | **Use** | **VFI vs. Standard** | **Where to connect** |
| -------------------- | -------------------------------------------------- | -------------------------------------------------------- | ---------------------------------------------------------------------------------------------------------------------------- |
| Debug | Bridge for console and fastboot/edl mode | Verifone
P/N: M400BAS
P/N: MN: 445-113-01-A
| On device.
Android USB-C switch on the bridge must be set to "on"
|
| USB-Type C <-> USB-A | QDL Flat image loading, fastboot connection. | Standard | USB Type-C on debug bridge **"Android" side** to USB type-A of PC |
| Ethernet cable | Netloader, any eth connection | Standard / Verifone P/N: 445-102-01-A | Eth on debug bridge to network plug |
| Console cable | Console logs | Standard | Console port on debug bridge "Android" side to COM port.
COM port can be connected to COM switch.
|
| Power supply | Powering the device
P/N: PWR132-003-01-A
| Verifone | Power connector on debug bridge |
**Debug bridge with P/N and connections:**
%20\(1\).png?alt=media) %20\(1\).png?alt=media)
To get ETH work with debug cable the ETH cube must connect next to the power.

**Power supply:**

**QFIL/EDL mode enable startup button:**

### Device Cabling UX700 AIO
| **Cable** | **Use** | **VFI vs. Standard** | **Where to connect** |
| --------------------- | ------------------------------------------------- | -------------------------------------- | --------------------------------------------------- |
| Debug | Bridge for console and fastboot/edl mode | Verifone
P/N CBL184-700-01-A
| On device |
| USB-Micro-B <-> USB-A | QDL Flat image loading, fastboot connection | Standard | USB Micro-B on debug bridge to USB type-A of PC |
| Ethernet cable | Netloader, any eth connection | Standard | Eth on debug bridge to network plug |
| USB-RS232 adapter | Console logs | Verifone
P/N 24805-02-R
| RS232 plug on debug bridge COM2 to USB type-A of PC |
| Power supply | Powering the device
P/N PWR474-002-01-A
| Verifone | On device |
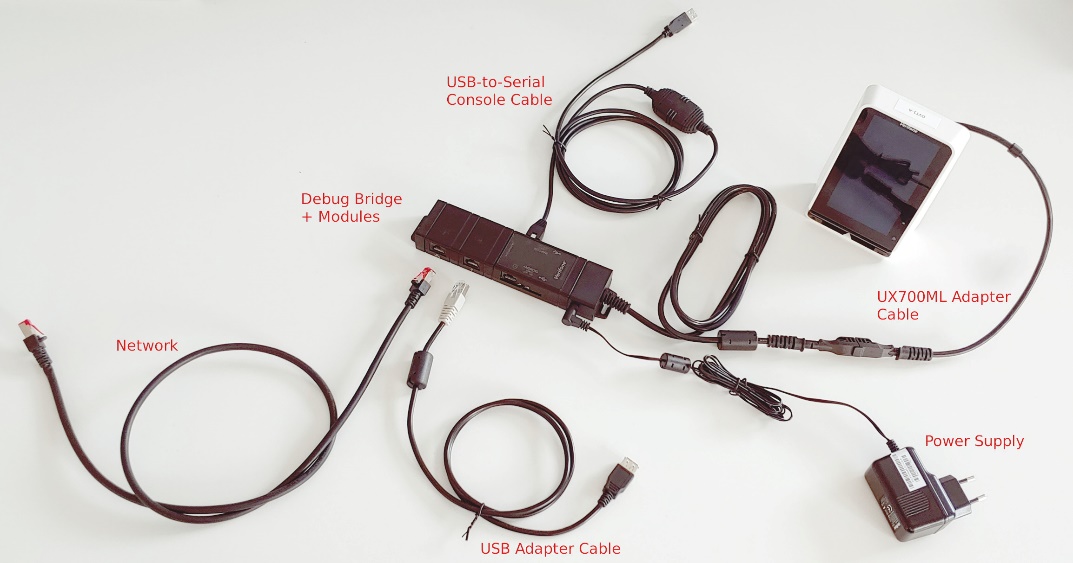
### Device Cabling UX700 ML
| **Cable** | **Use** | **VFI vs. Standard** | **Where to connect** |
| ---------------------- | ---------------------------------------------------------------------------------------------- | ------------------------------------------------------------------------------------------------------------------------ | --------------------------------------------------- |
| UX700 ML Adapter Cable | Connection to debug bridge
CBL184-700-04-A
| Verifone | Device ↔ Debug Bridge |
| Debug Bridge | Bridge for console and fastboot/edl mode
+ extension modules
Network
USB
| Verifone
Bridge:
- 445-101-01-A
- LBL445-003-01-A
Network:
MSC445-031-00-A
USB:
445-103-01-A
| Device (Adapter Cable) |
| Ethernet Cable | Netloader, any eth connection | Standard | Eth on debug bridge to network plug |
| USB Adapter Cable | Adapter to load from USB stick
CBL132-003-01-A
| Verifone | Bridge USB Module |
| USB-RS232 Adapter | Console logs | Verifone
P/N 24805-02-R
| RS232 plug on debug bridge COM2 to USB type-A of PC |
| Power Supply | Powering the device
One of:
PWR445-001-01-A
PWR445-001-02-A
PWR445-001-03-A
| Verifone | Debug bridge |
 ### Setting for development (USB)
If you are using a Virtual Machine (VM), you must enable USB devices in the VM, so they are passed into your Linux VM. Whenever you attach a new USB cable, or enter a new mode in the terminal (fastboot, ...), you might want to check the Windows device manger menu for new devices and enable one of these for the VM as needed. Typically a VM either allows you to add a specific device once, or add them to a filter (see the image to the right).
Once enabled, go to a Linux shell and check connected devices with
```
lsusb
```
You should see an entry.
### Enable console logs (on Linux)
* Enable logs in fastboot
```
fastboot oem console 1
```
* Make sure, the USB-Serial connector is enabled. You can check with lsusb in a Linux shell (see above)
* Find the ttyUSB device, which it is connected to. This may change from time to time, so if it does not work, adjust the device number
```
ll /dev/ttyUSB*
```
* use a terminal program (e.g. kermit) and set the USB connectivity to the ttyUSB device and set speed to 115200 baud and enable flow control XON/OFF
---
# Agent Instructions
This documentation is published with GitBook. GitBook is the documentation platform designed so that both humans and AI agents can read, navigate, and reason over technical content effectively. Learn more at gitbook.com.
## Querying This Documentation
If you need additional information that is not directly available in this page, you can query the documentation dynamically by asking a question.
Perform an HTTP GET request on the current page URL with the `ask` query parameter, and the optional `goal` query parameter:
```
GET https://docs.verifone.com/adk-os-platform/readme/developing-applications/preparing-development-devices.md?ask=&goal=
```
`ask` is the immediate question: it should be specific, self-contained, and written in natural language.
`goal` is optional and describes the broader end goal you are ultimately trying to accomplish on behalf of the user. GitBook uses it to tailor the answer towards what is most useful for that goal.
The response will contain a direct answer to the question and relevant excerpts and sources from the documentation.
Use this mechanism when the answer is not explicitly present in the current page, you need clarification or additional context, or you want to retrieve related documentation sections.
### Setting for development (USB)
If you are using a Virtual Machine (VM), you must enable USB devices in the VM, so they are passed into your Linux VM. Whenever you attach a new USB cable, or enter a new mode in the terminal (fastboot, ...), you might want to check the Windows device manger menu for new devices and enable one of these for the VM as needed. Typically a VM either allows you to add a specific device once, or add them to a filter (see the image to the right).
Once enabled, go to a Linux shell and check connected devices with
```
lsusb
```
You should see an entry.
### Enable console logs (on Linux)
* Enable logs in fastboot
```
fastboot oem console 1
```
* Make sure, the USB-Serial connector is enabled. You can check with lsusb in a Linux shell (see above)
* Find the ttyUSB device, which it is connected to. This may change from time to time, so if it does not work, adjust the device number
```
ll /dev/ttyUSB*
```
* use a terminal program (e.g. kermit) and set the USB connectivity to the ttyUSB device and set speed to 115200 baud and enable flow control XON/OFF
---
# Agent Instructions
This documentation is published with GitBook. GitBook is the documentation platform designed so that both humans and AI agents can read, navigate, and reason over technical content effectively. Learn more at gitbook.com.
## Querying This Documentation
If you need additional information that is not directly available in this page, you can query the documentation dynamically by asking a question.
Perform an HTTP GET request on the current page URL with the `ask` query parameter, and the optional `goal` query parameter:
```
GET https://docs.verifone.com/adk-os-platform/readme/developing-applications/preparing-development-devices.md?ask=&goal=
```
`ask` is the immediate question: it should be specific, self-contained, and written in natural language.
`goal` is optional and describes the broader end goal you are ultimately trying to accomplish on behalf of the user. GitBook uses it to tailor the answer towards what is most useful for that goal.
The response will contain a direct answer to the question and relevant excerpts and sources from the documentation.
Use this mechanism when the answer is not explicitly present in the current page, you need clarification or additional context, or you want to retrieve related documentation sections.