> For the complete documentation index, see [llms.txt](https://docs.verifone.com/llms.txt). Markdown versions of documentation pages are available by appending `.md` to page URLs; this page is available as [Markdown](https://docs.verifone.com/feature-references/feature-references-lac-es/referencias-de-funciones-y-productos/impresora-de-cocina/configuracion-de-la-impresora-de-cocina/reasignacion-de-puertos-com.md).
# Reasignación de puertos COM
Cuando una impresora de cocina se mueve de un puerto a otro en el mismo terminal POS, es necesario reconfigurar el sistema para reflejar ese cambio. Utilice las instrucciones a continuación para configurar el cambio en Kitchen Printer Service.
{% hint style="warning" %}
Antes del cambio de configuración, el RS-232 debe desconectarse y moverse al nuevo puerto en el terminal POS host.
{% endhint %}
En este ejemplo, topaz101 actualmente tiene una impresora de cocina en COM1. Hay un puerto disponible en COM2 para mover la impresora de cocina.
{% stepper %}
{% step %}
Abrir la configuración actual
En el formulario de Módulos administrados, seleccione la pestaña \[Configuración actual].
{% endstep %}
{% step %}
Seleccione el host
En la lista desplegable Nombres de host, seleccione \[controlador del sitio].
{% endstep %}
{% step %}
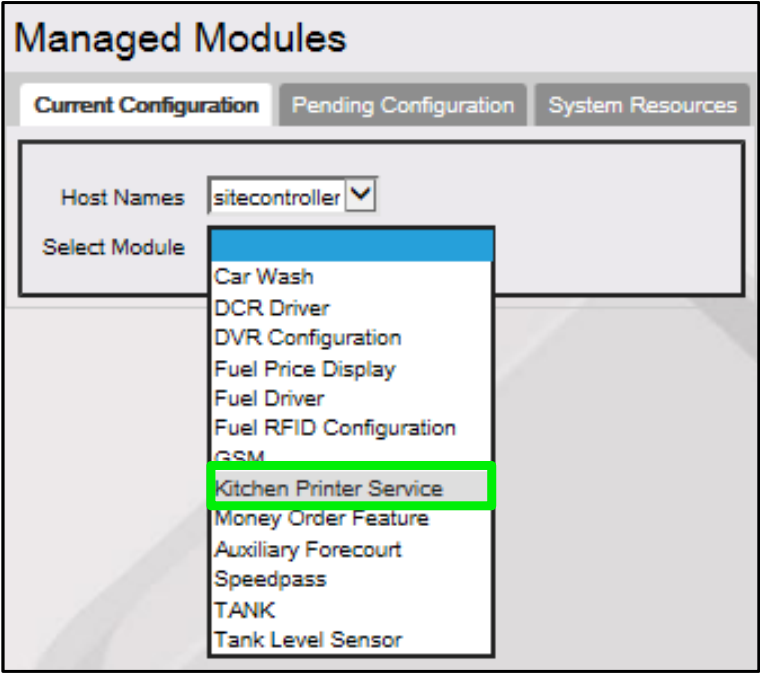
Seleccione Kitchen Printer Service
En la lista desplegable Seleccionar módulos, seleccione el módulo administrado \[Kitchen Printer Service].
{% endstep %}
{% step %}
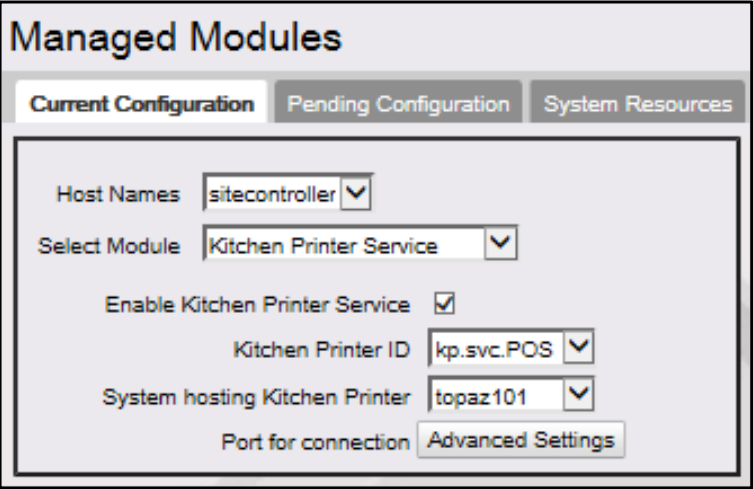
Abra el formulario de configuración actual
Se muestra el formulario de configuración actual.
{% endstep %}
{% step %}
Deshabilite el servicio
Desmarque \[Enable Kitchen Printer Service] desactivando la casilla de verificación de esta opción.
{% hint style="warning" %}
No habilite Kitchen Printer Service. Debe permanecer desmarcado hasta que el cambio de configuración esté completo y se verifiquen los ajustes.
{% endhint %}
{% endstep %}
{% step %}
Abra la configuración avanzada
Seleccione la opción de conexión de puerto \[Configuración avanzada].
{% endstep %}
{% step %}
Borre la asignación del puerto
En la lista desplegable Puerto para conexión, seleccione \[espacio en blanco].
{% endstep %}
{% step %}
Guarde el cambio
Seleccione \[Guardar].
{% endstep %}
{% step %}
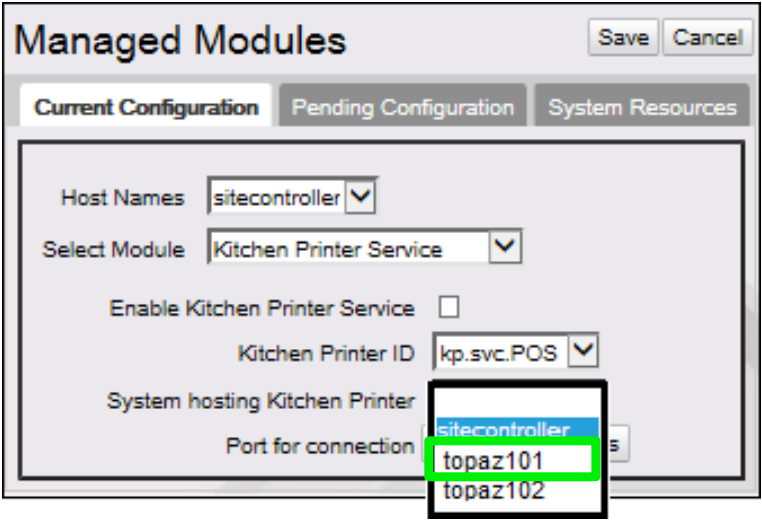
Seleccione el terminal POS
En la lista desplegable Sistema que aloja Kitchen Printer, seleccione el \ al que está conectada la impresora de cocina.
{% endstep %}
{% step %}
Abra la configuración avanzada
Seleccione la opción de conexión de puerto \[Configuración avanzada].
{% endstep %}
{% step %}
Seleccione el nuevo puerto COM
En la lista Puerto para conexión, seleccione el \ al que se conectará el cable RS-232 de la impresora de cocina en el terminal POS.
{% hint style="info" %}
La lista desplegable Puerto para conexión siempre se completará con todos los puertos COM disponibles (no asignados) del host seleccionado.
{% endhint %}
En el ejemplo anterior, la impresora de cocina se movió en el topaz101 de COM1 a COM2.
{% endstep %}
{% step %}
Guarde el cambio
Seleccione \[Guardar].
{% endstep %}
{% step %}
Vuelva a habilitar el servicio
Por último, seleccione la casilla \[Enable Kitchen Printer Service] para habilitar los servicios de impresión.
{% endstep %}
{% step %}
Guarde y verifique
Seleccione \[Guardar] para aceptar, o \[Cancelar] para salir sin guardar los cambios.
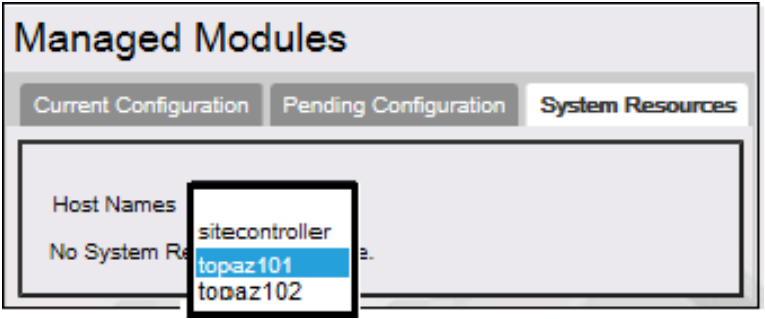
Para verificar que Kitchen Printer Service se inició correctamente, vaya a la pestaña \[Recursos del sistema].
En la lista desplegable Nombres de host, seleccione el \ que desea ver.
Verifique que el \ configurado muestre Kitchen Printer Service (kp.svc.POS).
Kitchen Printer Service se está mostrando para el host seleccionado (topaz101) en COM2, donde la impresora de cocina está conectada físicamente.
{% endstep %}
{% endstepper %}
---
# Agent Instructions
This documentation is published with GitBook. GitBook is the documentation platform designed so that both humans and AI agents can read, navigate, and reason over technical content effectively. Learn more at gitbook.com.
## Querying This Documentation
If you need additional information that is not directly available in this page, you can query the documentation by asking a question.
Perform an HTTP GET request on the following URL with the `ask` and `goal` query parameters:
```
GET https://docs.verifone.com/feature-references/feature-references-lac-es/referencias-de-funciones-y-productos/impresora-de-cocina/configuracion-de-la-impresora-de-cocina/reasignacion-de-puertos-com.md?ask=&goal=
```
`ask` is the immediate question: it should be specific, self-contained, and written in natural language.
`goal` is what the user is ultimately trying to achieve, the reason they need the answer. Sharing it helps GitBook give you a better, more relevant answer. A goal is most helpful when it describes the outcome the user wants rather than restating the question. For example, with `ask=how do I create an API token`, a goal like `automate deployments from our CI pipeline` lets GitBook tailor the answer to that use case.
The response will contain a direct answer to the question and relevant excerpts and sources from the documentation.
Use this mechanism when the answer is not explicitly present in the current page, you need clarification or additional context, or you want to retrieve related documentation sections.

 {% endstep %}
{% step %}
Abra el formulario de configuración actual
Se muestra el formulario de configuración actual.
 {% endstep %}
{% step %}
Deshabilite el servicio
Desmarque \[Enable Kitchen Printer Service] desactivando la casilla de verificación de esta opción.
{% hint style="warning" %}
No habilite Kitchen Printer Service. Debe permanecer desmarcado hasta que el cambio de configuración esté completo y se verifiquen los ajustes.
{% endhint %}
{% endstep %}
{% step %}
Abra la configuración avanzada
Seleccione la opción de conexión de puerto \[Configuración avanzada].


 {% endstep %}
{% step %}
Abra la configuración avanzada
Seleccione la opción de conexión de puerto \[Configuración avanzada].


 En la lista desplegable Nombres de host, seleccione el \
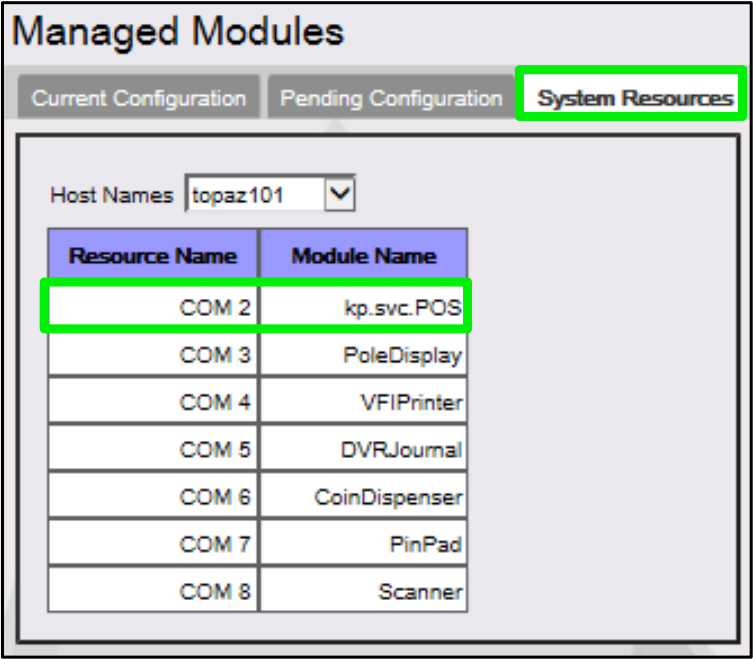 Kitchen Printer Service se está mostrando para el host seleccionado (topaz101) en COM2, donde la impresora de cocina está conectada físicamente.
{% endstep %}
{% endstepper %}
---
# Agent Instructions
This documentation is published with GitBook. GitBook is the documentation platform designed so that both humans and AI agents can read, navigate, and reason over technical content effectively. Learn more at gitbook.com.
## Querying This Documentation
If you need additional information that is not directly available in this page, you can query the documentation by asking a question.
Perform an HTTP GET request on the following URL with the `ask` and `goal` query parameters:
```
GET https://docs.verifone.com/feature-references/feature-references-lac-es/referencias-de-funciones-y-productos/impresora-de-cocina/configuracion-de-la-impresora-de-cocina/reasignacion-de-puertos-com.md?ask=