For the complete documentation index, see llms.txt. This page is also available as Markdown.

Device Setup

This section outlines the setup procedures for the Verifone Carbon Mobile 5 covering the following segments:


Usage Guidelines

Use the following guidelines when using your Verifone Carbon Mobile 5.

Environmental Factors

  • Select a flat support surface, such as a countertop or table, place the device. Please store your Verifone Carbon Mobile 5 device in a dry area:

    • Operation temperature is 0° C to 50° C (32° F to 122 ° F).

    • Storage temperature is -20° C to 60° C (-4° F to 140 ° F).

  • Do not use the device where there is high heat, dust, humidity, moisture, or caustic chemicals or oils.

  • Keep the device away from direct sunlight and anything that radiates heat, such as a stove or motor.

Personal Security Considerations

The Verifone Carbon Mobile 5 can be used as a handover device. Always exercise extreme caution when conducting transactions, especially during PIN entry.

  • Hand the Verifone Carbon Mobile 5 directly to the cardholder for PIN entry.

  • Encourage the cardholder to hold the Verifone Carbon Mobile 5 close to avoid others from seeing the information entered.

Electrical Considerations

  • Avoid using this product during electrical storms.

  • Avoid locations near electrical appliances or other devices that cause excessive voltage fluctuations or emit electrical noise (for example, air conditioners, electric motors, neon signs, high-frequency or magnetic security devices, or computer equipment).

  • Do not use the device near water or in moist conditions.


Unpacking the Shipping Carton

Open the shipping carton and carefully inspect its contents for possible tampering or shipping damage. The Verifone Carbon Mobile 5 is a secure product and any tampering may cause the device to cease to function properly.

1

Validate the authenticity of the sender

Validate the authenticity of the sender by verifying the shipping tracking number and other information located on the product order paperwork.

2

Remove and inspect the items

Remove and inspect the following items:

  • Verifone Carbon Mobile 5 unit

  • USB-C to USB cable

  • Paper roll

3

Remove the plastic wrapping

Remove all plastic wrapping from the unit and other components.

4

Remove the protective film

Remove the clear protective film from the display.

5

Save the carton and packing material

Save the shipping carton and packing material for future repacking or storing the device.

NOTE Verifone ships variants of the Verifone Carbon Mobile 5 for different markets. Your unit may have different options or accessories described in this section.

NOTE

  • Charge the Verifone Carbon Mobile 5 device for eight hours before initial use.

  • The Verifone Carbon Mobile 5 device includes an embedded coin cell battery that will power the security circuit of the device in case the main battery fails to charge. This internal coin cell battery is not rechargeable and has a life of 1 year.

  • Ensure not to store the device for more than 1 week without charging, else the secondary battery gets discharged in turn reducing the life of the battery.


Examining Verifone Carbon Mobile 5 Device Features

Before you continue the installation process, familiarize yourself with the features of the Verifone Carbon Mobile 5.

Front Panel

The front panel includes the following features:

Figure 4. Carbon Mobile 5 front panel features
  • The Verifone Carbon Mobile 5 device has a colored capacitive-touch LCD Display.

  • A smart card reader is built into the top of the device to process smart card-based debit or credit transactions. For directions on how to use a smart card, see Using the Smart Card Reader.

  • A magnetic card reader is built into the bottom part of the device for performing debit or credit card transactions. The card can be swiped from either direction. To ensure a proper read of the magnetic swipe card, insert the magnetic card from the side of the device as shown in Using the Magnetic Card Reader.

  • The Verifone Carbon Mobile 5 device has a power/charging indicator.

  • All LEDs to indicate CTLS, EMV, MSR, BT, and Wi-Fi are shown on the display.

  • CTLS around the display for contactless payments. For directions on how to conduct contactless transactions, see Using the CTLS Reader.


Installing or Replacing Battery

  • Turn off the CM5/CM5P.

  • Place the device face down on a soft, clean surface to protect the display from scratches.

  • Remove the battery cover from the bottom and remove the battery pack.

  • Install the battery pack and place the battery cover.

  • Turn off the Verifone Carbon Mobile 5 device.

  • Place the device face down on a soft, clean surface to protect the display from scratches.

  • Remove the battery cover from the bottom concerns.

  • Remove the primary battery from the battery compartment, and unplug the connector, then remove the battery pack.

  • Switch the battery pack and plug the connector first.

  • Place the primary battery to battery compartment.

  • Place the battery cover.


Installing or Replacing SAM Cards

When you first receive your Verifone Carbon Mobile 5, you may need to install one or more MSAM cards, or you may need to replace old cards.

NOTE The highest specified charging temperature of the battery pack is 55 +/-3°C. The lowest specified charging temperature of the battery pack is -5+/-3°C.

NOTE Verifone ships variants of the Verifone Carbon Mobile 5 for different markets. Your unit may have different options or accessories described in this section.

To Install or Replace SAMs/SIMs

  • Turn off the Verifone Carbon Mobile 5 device.

  • Place the device face down on a soft, clean surface to protect the display from scratches.

  • Remove the battery cover from the bottom and provide access to the MSAM card slot.

  • Remove any previously installed MSAM cards from the cardholder by pulling out the MSAM in a horizontal direction.

  • Insert a MSAM card (with contacts face down) by carefully sliding it into the slot until the card is fully inserted.

  • Make sure the card orientation is matching with the icon engraved in the housing.

  • Place the battery cover.

  • Turn off the Verifone Carbon Mobile 5 device.

  • Place the device face down on a soft, clean surface to protect the display from scratches.

  • Remove the battery cover from the bottom corners.

  • Remove the primary battery from the battery compartment, but keep the battery connected.

  • Remove any previously installed MSAM cards from the cardholder by pushing down on the Nano-SIM icon (or actual Nano-SIM card) and pulling out the MSAM in the horizontal direction.

  • Insert a MSAM card (with contacts face down) by carefully sliding it into the slot until the card is fully inserted.

  • Make sure the card orientation is matching with the icon engraved in the housing.

  • Place the primary battery.

  • Place battery cover.


Examining Connection Port

The Verifone Carbon Mobile 5 device has one primary USB-C port used for power and download.

Figure 5. Primary USB-C port connection diagram

Using the Battery

The Verifone Carbon Mobile 5 device uses a single-cell Li-Polymer battery or a dual-cell Li-Ion battery. The internal logic of the battery prevents both overcharging and undercharging (a fault condition in which the battery level goes well below the minimum acceptable charge and the battery becomes unusable).

Battery Features

The following are the features of the battery:

  • Single Li-Polymer cell for CM5 and two Li-Ion cells for CM5 printer.

  • A safety circuit that:

    • Prevents cell damage from overcharge, over-discharge, or overheating.

    • Activates when the battery is left in an unused device for an extended period.

NOTE

  • Charge the Verifone Carbon Mobile 5 device for eight hours before initial use.

  • The Verifone Carbon Mobile 5 device includes an embedded coin cell battery that will power the security circuit of the device in case the main battery fails to charge. This internal coin cell battery is not rechargeable and has a life of 1 year.

  • Do not store the device for more than 1 week without charging, else the secondary battery gets discharged in turn reducing the life of the battery.

  • Disconnecting and unplugging the device power pack, reduces the life of the coin cell battery, which does not recharge and must be replaced if drained.

  • Conserve battery power by turning the Verifone Carbon Mobile 5 device off when not in use. Do not let the battery charge fall below 10% for extended periods of time as this may permanently diminish the battery capacity. Recharge the battery by attaching the USB-C end of the power pack to the device and plugging the other end of the power pack into a wall outlet.

Manual Startup

Hold the start button for about 3 seconds until the device displays the startup screen.

NOTE Once the device is powered up, the Verifone ADK MAC screen is displayed.

Manual Shutdown

Hold the start button for about 1 second until the message is displayed on the screen. Touch the "Off" selection to turn off.

NOTE The screen is blank when the device has no power.

Battery Connector

Plug in the battery connector straight into the port as shown below to avoid damaging the connector pins.

Figure 6. Battery connector pin insertion

Connecting the Terminal Power Pack

Connect the Verifone Carbon Mobile 5 device to the provided USB cable and insert the other end into any USB charger head for initial charging.

Each Verifone Carbon Mobile 5 device comes with a power supply cable, USB-A to USB-C cable is used to connect the device directly to a USB outlet to charge the battery. The Verifone Carbon Mobile 5 unit is equipped with an USB capable universal port.

To Connect the Terminal Power Supply

  • Insert the USB-C to the Verifone Carbon Mobile 5 and the USB-A port to the power supply or desktop.

Figure 7. Power supply connection (USB-C to wall or desktop)

TIP To protect against possible damage caused by lightning strikes and electrical surges, consider installing a power surge protector.


Loading a Paper Roll in Device with Printer

Install a paper roll before you can process transactions that require a receipt. The Verifone Carbon Mobile 5 Printer Stand uses a roll of 58 mm x 40 mm, single-ply, thermal-sensitive paper.

A pink out-of-paper indicator line appears on the edge of the paper before the end of the roll. After this line appears, there is enough paper remaining on the roll to conclude at least one more transaction.

NOTE A message is always displayed to indicate when the printer is out of paper.

1

Hold the paper door and open it

Hold both sides of the paper door, which is on the upper corner of the device and open the paper door by pulling outside.

2

Remove any partial roll

Remove any partial roll of paper in the tray.

Figure 8. Steps to install a paper roll
3

Prepare the new roll

Loosen the glued leading edge of the new paper roll or remove the protective strip. Unwind the paper roll past any glue residue.

4

Position the roll

Hold the roll so the paper feeds from the top of the roll.

5

Pull the paper through

Pull the paper past the printer door.

6

Align the paper and close the door

Align the printer paper to the tabs to the paper guides and hold the paper up when closing the door.

7

Close the printer door

With the printer paper extending outside, close the printer door by swinging upward until the door clicks shut, allowing the printer paper to extend outside the printer door.


Charging the Battery

After unpacking your Verifone Carbon Mobile 5 device, connect the power pack to the unit for eight hours or until fully charged. Refer to the Using the Battery section for more details.

Battery Life

Charging and discharging the battery will cause normal wear on the battery.


Cable Connections

You can connect the Verifone Carbon Mobile 5 to peripherals using the Full-Function Base.

Cable Connections Using the Full-Feature Base

To connect the terminal to other devices via Ethernet, RS-232, and USB, use the Verifone Carbon Mobile 5 Full-Feature (FF) Base. The FF Base provides a standard RJ-45 LAN socket, RS-232 port, and a micro-USB port.

Figure 9. Full-Feature Base peripheral connections
Cable
Configuration

Ethernet port

RJ-45 socket (for connecting PINPad to LAN infrastructure)

RS232 port

RJ-45 socket

USB ports

Micro USB and type A USB


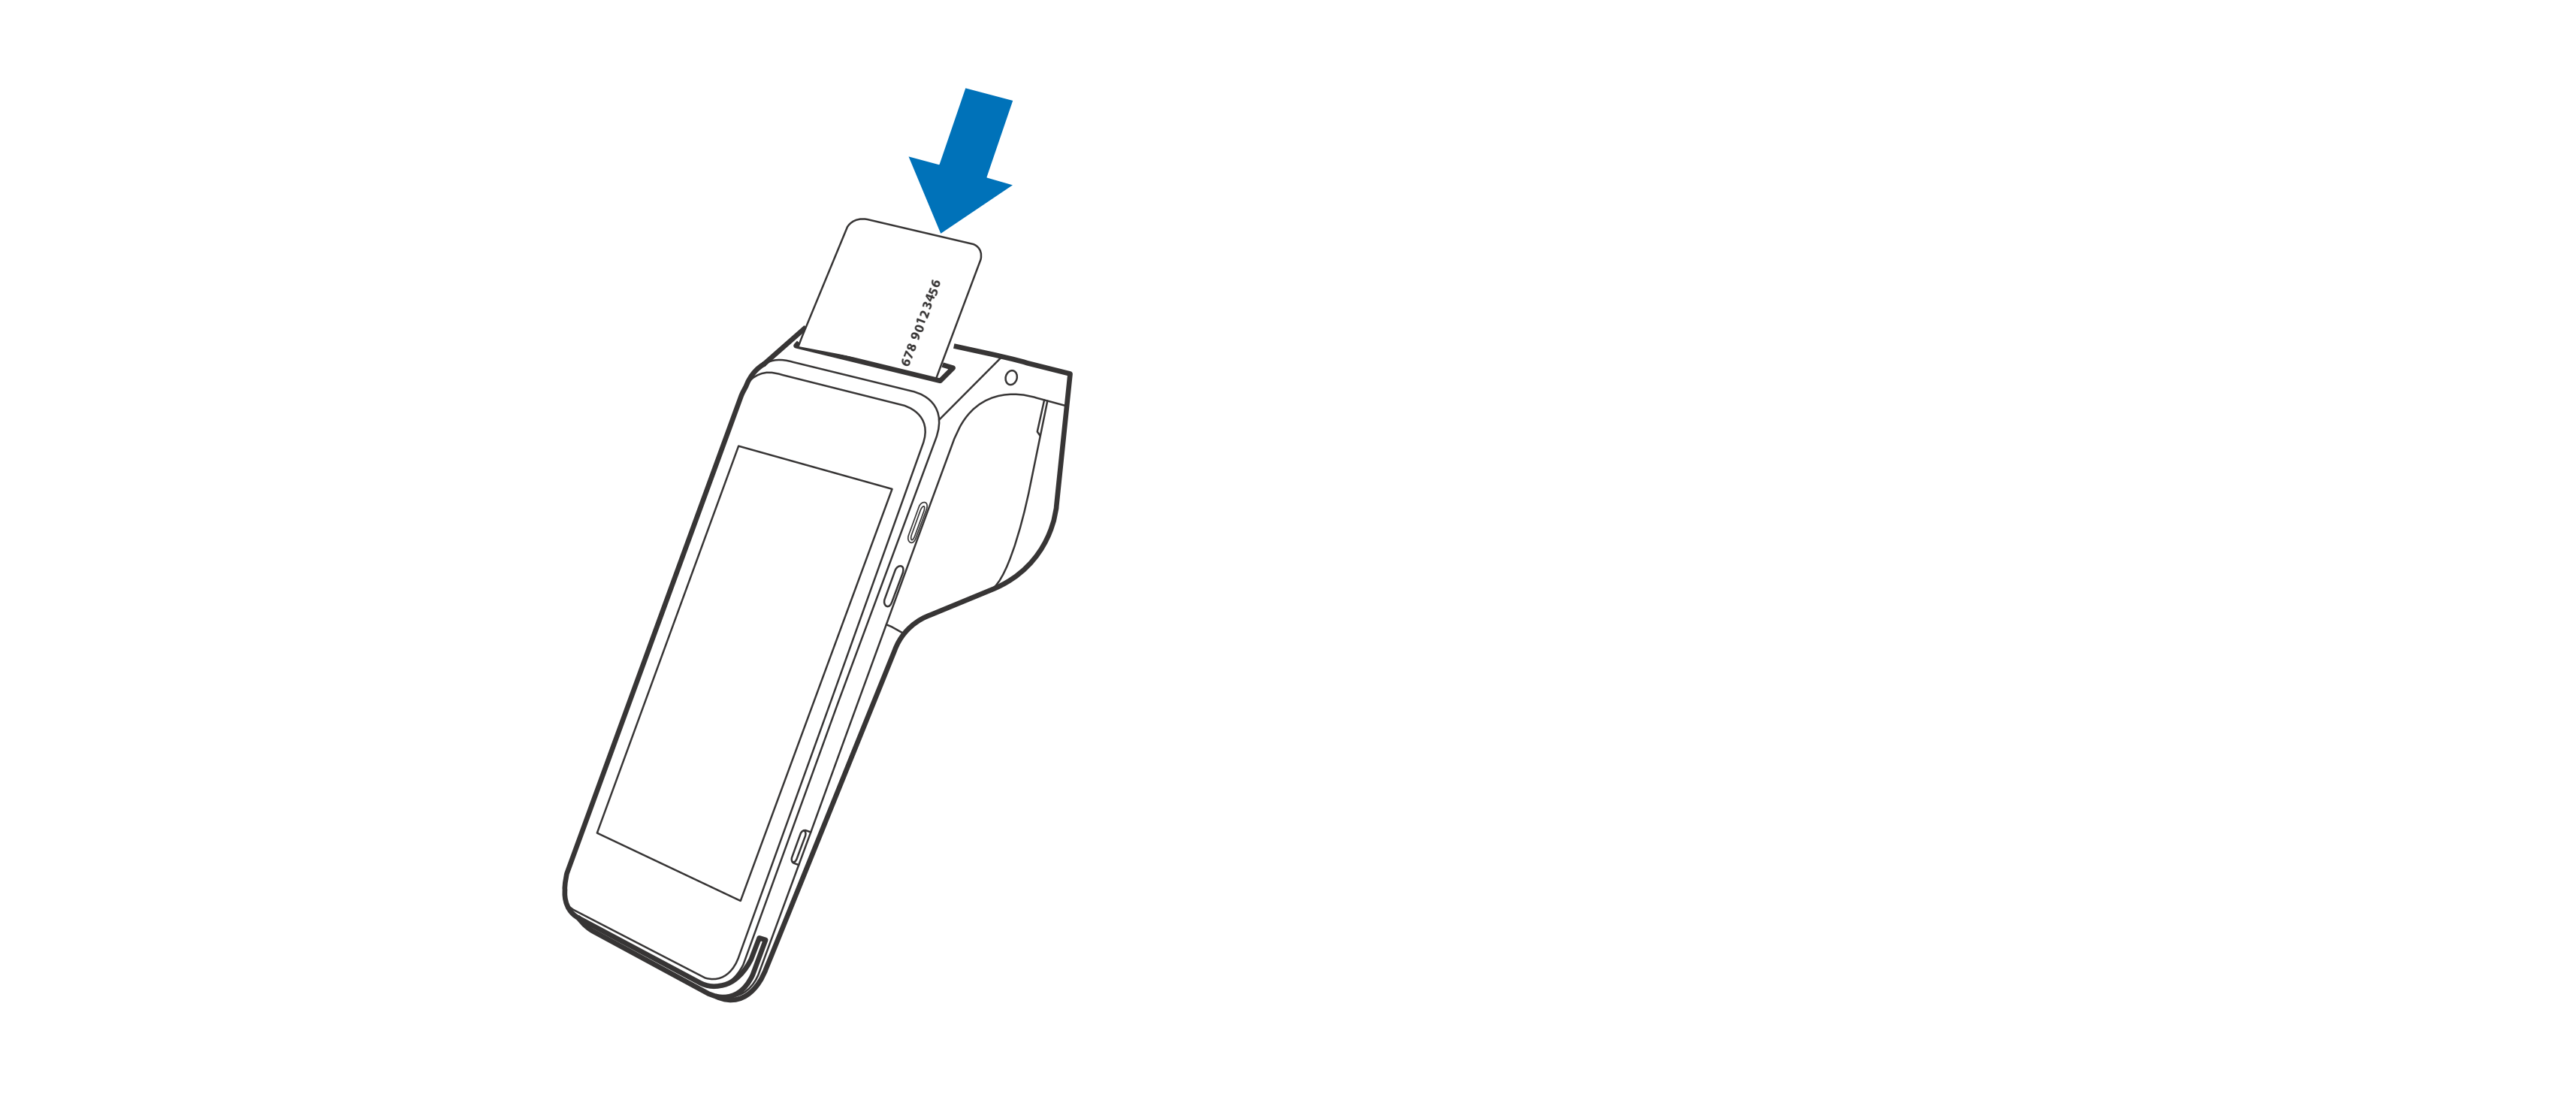
Using the Smart Card Reader

Insert the smart card to proceed with the EMV transaction. EMV supports credit card and debit card transactions.

To Conduct a Smart Card Transaction

  1. Position the smart card with the contacts facing upward.

  2. Insert the card into the reader slot in a smooth, continuous motion until it sits firmly.

  3. Wait for the application to indicate a completed transaction before removing the card. Premature card removal invalidates the transaction.


Figure 10. Inserting a smart card

Using the Magnetic Card Reader

Use the magnetic stripe reader to perform credit and debit card transactions.

To Conduct a Debit or Credit Card Transaction

  1. Position the card with the magnetic stripe facing backward.

  2. To ensure a proper read of the magnetic swipe card, insert the magnetic card from the side of the device.

  3. See Figure 11.

Figure 11. Using the magnetic stripe card reader
  1. Swipe the card through the magnetic card reader.


Using the CTLS Reader

The Verifone Carbon Mobile 5 supports contactless credit or debit card transactions. To perform a contactless transaction, gently tap the card or hold the card against the surface of the display.

Figure 12. Using the CTLS reader

Optional Accessories

These accessories can be used to further enhance the device's functionality.

Bluetooth Pairing Between Full-Feature Base and CM5P

1

Download and install the Base Control app

Download and Install Base Control app.

Figure 13. Download Base Control app screen
2

Turn on Bluetooth and open the pairing option

Make sure Bluetooth is turned ON and go to "PAIR A NEW DOCK" option in the app.

3

Follow the app instructions

Follow the instructions from the app to press the pairing button on the base.

4

Align the circles and LED lights

On the next screen, use the camera to align the circles over the LED lights on the side of the base while the device lays on its side.

5

Hold still until pairing starts

Make sure the circles and the LED lights on the base are lined up, hold still CM5P and pairing will start automatically.

6

Hold the pairing button

Follow the instructions on the screen to hold the pairing button on the base for 3 seconds and release the button.

Figure 14. CM5P Bluetooth pairing with base
7

Confirm the connected dock

Once pairing is successfully completed, the base with its S/N will show up under "Connected Docks" on the screen.

Full-Feature Base

The Full-Feature Base (VPN M278-S02-08) provides Bluetooth (BT) 4.2. It also supplies power, Ethernet, USB Host and USB Device, plus powered RS232 connection. See Cable Connections Using the Full-Feature Base.

Figure 15. CM5 docking with Full-Feature Base

Charging Base

The Charging Base (VPN M278--S02-00) provides a stable dock plus power charging for the CM5 terminal.

Figure 16. CM5 docking with Charging Base

Car Charger

The Car Charger (VPN PWR278-100-01-A) provides a Built-in protection from power surges & heat.

Figure 17. Car Charger

Its multi-layer protection safeguards the devices from overcharging and overheating giving a safe charging experience. With its Type-C output port, the charger is compatible with a wide range of devices.

When the device detects the Car charger will automatically switch to "Vehicle charge mode" in "Settings->Battery->Battery Charge Mode setting".

Car Charger Detected.

Car charger will be detected in Vehicle Charge Mode and automatically ENABLED (selected) and BLOCKED to the user.

Car Charger Removed.

Car Charger will be removed the Vehicle Charge Mode would remain ENABLED (selected) but the user would have the option to select another charger mode.

Last updated

Was this helpful?