> For the complete documentation index, see [llms.txt](https://docs.verifone.com/llms.txt). Markdown versions of documentation pages are available by appending `.md` to page URLs; this page is available as [Markdown](https://docs.verifone.com/hardware-products/hardware/android-devices/v660-series/v660p/v660p-installation-guide/device-setup.md).
# Device Setup
This chapter describes the device setup procedure. You will learn about:
* [Device Location](#device-location)
* [Inside the Shipping Carton](#inside-the-shipping-carton)
* [Device Features](#device-features)
* [SAM Card](#sam-card)
* [Examining Connection Port](#examining-connection-port)
* [Using the Battery](#using-the-battery)
* [Connecting the Terminal Power Pack](#connecting-the-terminal-power-pack)
* [Loading a Paper Roll in Device](#loading-a-paper-roll-in-device)
* [Charging the Battery](#charging-the-battery)
* [Using the Smart Card Reader](#using-the-smart-card-reader)
* [Using the Magnetic Card Reader](#using-the-magnetic-card-reader)
* [CTLS Transaction](#ctls-transaction)
* [Wi-Fi/BT Support](#wi-fi-bt-support)
* [Camera/QR Code Reader](#camera-qr-code-reader)
## Device Location
The following are the guidelines used to select an ideal location for the device.
### Environmental Factors
* Select a flat support surface, such as a countertop or table, place the device. Please store your V660p-1 device in dry area:
* Operation temperature is 0 to 45° Celsius (32° F to 113° F).
* Storage temperature is -20 to 60° Celsius (-4° F to 140° F).
* Select a location convenient for both the merchant and the cardholder.
* Select a flat support surface, such as a countertop or table, place the device.
* Keep the device away from direct sunlight and anything that radiates heat, such as a stove or motor.
* Do not use the device where there is high heat, dust, humidity, moisture, or caustic chemicals or oils.
{% hint style="warning" %}
The device is not waterproof or dustproof and is intended for indoor use only. Any damage to the unit from exposure to rain or dust may void any warranty.
{% endhint %}
### Personal Security Considerations
The V660p-1 can be used as handover device. Always exercise extreme caution when conducting transactions especially during PIN entry.
* Hand the V660p-1 directly to the cardholder for PIN entry.
* Encourage the cardholder to hold the V660p-1 close to avoid others from seeing the information entered.
### Electrical Considerations
* Avoid using this product during electrical storms.
* Avoid locations near electrical appliances or other devices that cause excessive voltage fluctuations or emit electrical noise (for example, air conditioners, electric motors, neon signs, high-frequency or magnetic security devices, or computer equipment).
* Avoid using the device near water or in moist conditions.
* Disconnect the device from its POS device before cleaning.
{% hint style="danger" %}
Do not use the device near water, including a bathtub, washbowl, kitchen sink or laundry tub, in a wet basement, or near a swimming pool to avoid shock or damage.
{% endhint %}
## Inside the Shipping Carton
Open the shipping carton and carefully inspect its contents for possible tampering or shipping damage. The device is a secure product. Tampering causes it to cease to function or to operate in an unsecured manner.
#### Unpacking the Shipping Carton
{% stepper %}
{% step %}
Carefully inspect the shipping carton and its contents for possible tampering or damage.
{% endstep %}
{% step %}
Validate the authenticity of the sender by verifying the shipping tracking number and other information located on the product order paperwork.
{% endstep %}
{% step %}
Remove and inspect the following items:
* V660p-1 unit
* USB-C to USB cable
* Paper roll
{% hint style="info" %}
Verifone ships variants of the V660p-1 for different markets. Your unit may have different options or accessories described in this section.
{% endhint %}
{% endstep %}
{% step %}
Remove all plastic wrapping from the device and components.
{% endstep %}
{% step %}
Remove the clear protective film from the display.
{% endstep %}
{% step %}
Inspect the terminal for possible tampering. See how to identify signs of tampering in section [Periodic Inspection.](#periodic-inspection)
{% hint style="danger" %}
Do not use a tampered or damaged unit. The device comes equipped with tamper-evident labels. If a label or component appears damaged, please notify the shipping company and your Verifone service provider immediately.
{% endhint %}
{% endstep %}
{% step %}
Save the shipping carton and packing material for future repacking or moving of the device.
{% endstep %}
{% endstepper %}
### Periodic Inspection
Periodically inspect the terminal for possible tampering. Signs of tampering include:
* Wires protruding out of the device.
* Foreign objects inserted into the smart card slot or magnetic stripe slot.
* Any bumps in the casing below the mag stripe slot and any noticeable additional mag stripe head from the side.
* Signs of damage to the tamper-evident labels.
* A Tamper Warning message on the device display.
If any device is found to have been tampered with, please remove it from service immediately, keep it available for potential forensics investigation, and notify your company security officer and your local Verifone representative or service provider. To contact Verifone, please see [Verifone Service and Support](/hardware-products/hardware/android-devices/v660-series/v660p/v660p-installation-guide/service-and-support.md).
## Device Features
Familiarize yourself with the features before continuing with the installation process:
### Front Panel
The front panel offers the following features:
* The V660p-1 device has a colored touch screen display.
* A smart card reader is built into the front of the device to process smart card-based debit or credit transactions. For directions on how to use a smart card, see [Using the Smart Card Reader](/hardware-products/hardware/android-devices/v660-series/v660p/v660p-installation-guide/device-setup.md#using-the-smart-card-reader).
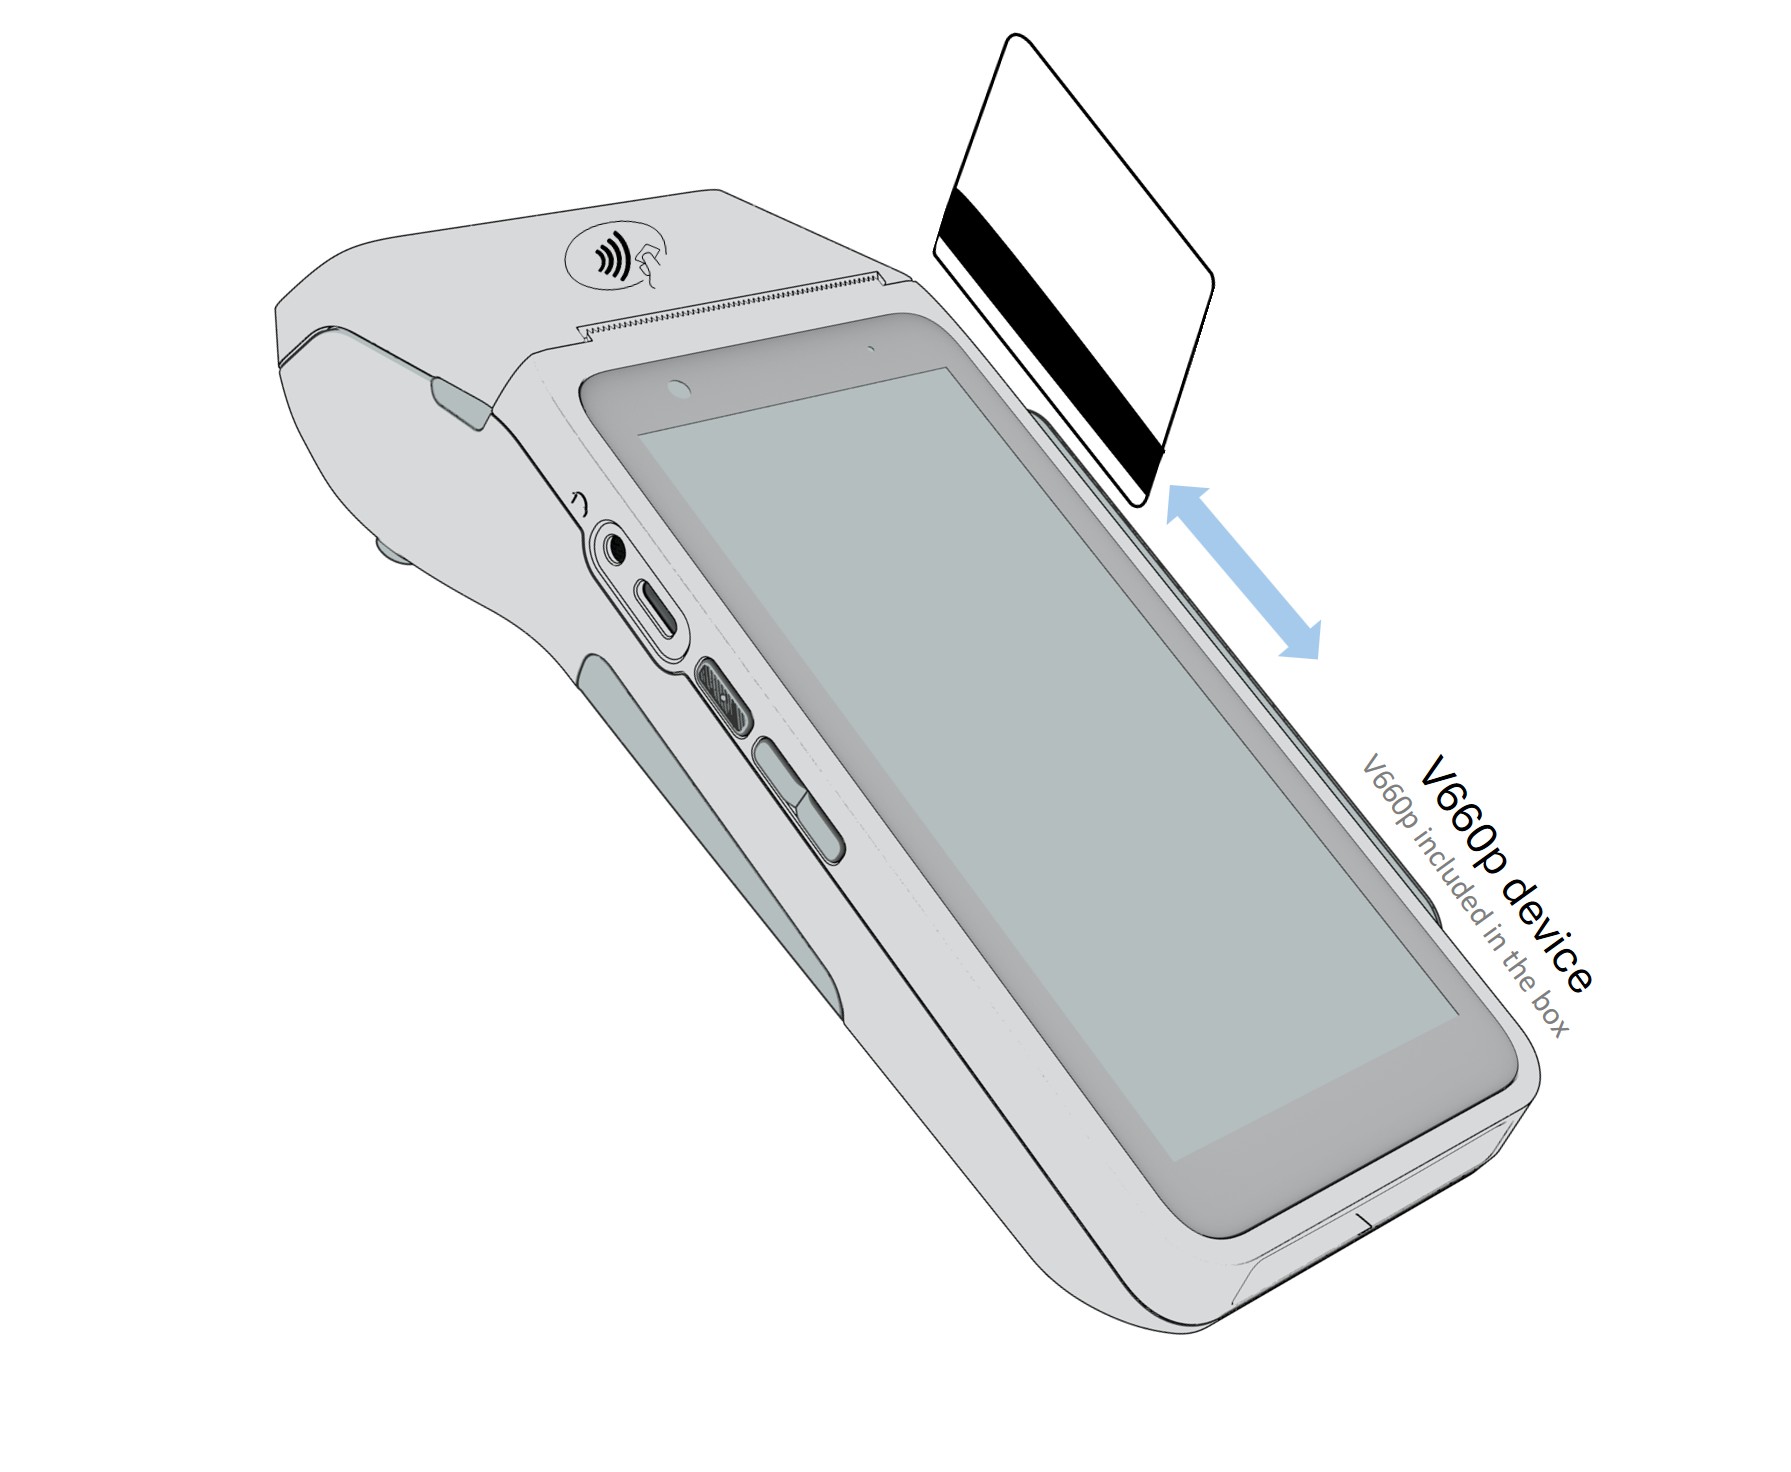
* A magnetic card reader built into the device for performing debit or credit card transactions. The card can be swiped from either direction. To ensure a proper read of the magnetic swipe card, insert the magnetic card from the side of the device.
* Contactless Reader and EMV have dedicated LEDs lower to the left of the display for contactless payments. For directions on how to conduct contactless transactions, see [CTLS Transaction](/hardware-products/hardware/android-devices/v660-series/v660p/v660p-installation-guide/device-setup.md#ctls-transaction).
* A 3.5 mm audio jack to facilitate accessibility for the visually impaired.
## SAM Card
When you first receive your V660p-1, you may need to install one or more SAM cards, or you may need to replace old cards. You may need to install one or two Multiple Security Access Module cards or replace an old one.
{% hint style="warning" %}
Observe standard precautions when handling electrostatically sensitive devices. Electrostatic discharges can damage this equipment. Verifone recommends using a grounded anti-static wrist strap.
{% endhint %}
{% stepper %}
{% step %}
Power off the device.
{% endstep %}
{% step %}
Place the device face down on a soft and clean surface.
{% endstep %}
{% step %}
Remove the back cover of the unit.
{% endstep %}
{% step %}
Turn over the battery without removing the battery from the battery compartment.
{% endstep %}
{% step %}
Insert the SAM cards without removing the battery. Carefully slide the card into\
the slot until fully inserted. Ensure the SAM card is oriented correctly.
{% endstep %}
{% step %}
Turn the battery back into the compartment and place it in the slot.
{% endstep %}
{% endstepper %}
{% hint style="info" %}
Position the card's gold contacts facing downward towards the user. The card slot in the device has a set of contacts. The SIM/SAM card has a notch on one corner to ensure that it fits into the connector base in only one way.
{% endhint %}
## Examining the Connection Port
The V660p-1 device has one primary USB-C port used for power and downloads.
## Using the Battery
The V660p-1 device uses a dual-cell Li-Ion battery. The internal logic of the battery prevents both overcharging and undercharging (a fault condition in which the battery level goes well below the minimum acceptable charge and the battery becomes unusable).
### Battery Features
The following are features of the battery:
* Two Li-Ion cells
* A safety circuit that:
* Prevents cell damage from overcharge, over-discharge, or overheating.
* Activates when the battery is left in an unused device for an extended period.
{% hint style="info" %}
Charge the V660p-1 device for eight hours before initial use.
Disconnecting and unplugging the device power pack reduces the life of the coin cell battery, which does not recharge and must be replaced if drained.
Conserve battery power by turning the V660p-1 devices off when not in use. Do not let the battery charge fall below 10% for an extended period of time as this may permanently diminish the battery capacity. Recharge the battery by attaching the USB-C end of the power pack to the device and plugging the other end of the power pack into a wall outlet.
{% endhint %}
### Manual Startup
Hold the start button for about 3 seconds until the device displays the startup screen.
### Manual Shutdown
Hold the start button for about 1 second until the message is displayed on the screen. Touch the "Off" selection to turn off.
{% hint style="info" %}
The screen is blank when the device has no power.
{% endhint %}
## Connecting the Terminal Power Pack
Connect the V660p-1 devices to the provided USB cable and insert the other end into any USB charger head for initial charging.
{% hint style="warning" %}
Using an incorrectly rated power supply may damage the device or cause it not to work as specified. Before troubleshooting, ensure that the power supply being used to power the device matches the requirements specified on the bottom of the device. (See [Specifications](/hardware-products/hardware/android-devices/v660-series/v660p/v660p-installation-guide/specifications.md) for detailed power supply specifications.) You can use any standard USB charger.
{% endhint %}
{% hint style="danger" %}
Do not plug the power pack into an outdoor outlet or operate the device outdoors.
During a transaction, disconnecting the power by unplugging the device from a wall power while at very low battery charge may cause transaction data files not yet stored in the device memory to be lost.
{% endhint %}
Each V660p-1 device comes with a power supply cable, USB-A to USB-C cable is used to connect the device directly to a USB outlet to charge the battery. The V660p-1 unit is equipped with a USB-capable universal port.
### To Connect the Terminal Power Supply
Insert the USB-C into the V660p-1 and the USB-A port into the power supply or Desktop.
{% hint style="success" %}
To protect against possible damage caused by lightning strikes and electrical surges, consider installing a power surge protector.
{% endhint %}
### Loading a Paper Roll in Device
Install a paper roll before you can start transactions that require a receipt.
The V660p-1 uses a roll of 40 mm, single-ply, thermal-sensitive paper.
A pink **out-of-paper** indicator line appears on the edge of the paper before the end of the roll. After this line appears, there is enough paper remaining on the roll to perform at least one more transaction.
{% hint style="info" %}
A message is always displayed to indicate that the printer is out of paper.
{% endhint %}
{% hint style="warning" %}
Poor-quality paper can jam the printer and create excessive paper dust. To place order for high-quality Verifone paper, refer to [Accessories and Documentation](/hardware-products/hardware/android-devices/v660-series/v660p/v660p-installation-guide/service-and-support.md#accessories-and-documentation).
Store thermal paper in a dry, dark area. Handle thermal paper carefully: impact, friction, temperature, humidity, and oils affect the color and storage characteristics of the paper.
Never load a roll of paper with folds, wrinkles, tears, or holes at the edges.
{% endhint %}
## To install a paper roll
{% stepper %}
{% step %}
Hold both sides of the paper door, which is on the upper corner of the device and open the paper door by pulling outside.
{% endstep %}
{% step %}
Remove any partial roll of paper in the tray.
{% endstep %}
{% step %}
Loosen the glued leading edge of the new paper roll or remove the protective strip. Unwind the paper roll past any glue residue.
{% endstep %}
{% step %}
Hold the roll so that paper feeds from the bottom of the roll.
{% endstep %}
{% step %}
Pull the paper past the printer door.
{% endstep %}
{% step %}
Align the printer paper to the tabs to the paper guides and hold the paper up when closing the door.
{% endstep %}
{% step %}
With the printer paper extending outside, close the printer door by swinging upward until the door clicks shut, allowing the printer paper to extend outside the printer door.
{% endstep %}
{% endstepper %}
## Charging the Battery
After unpacking your V660p-1 devices, connect the power pack to the unit for eight hours or until fully charged. Refer to the [Using the Battery](/hardware-products/hardware/android-devices/v660-series/v660p/v660p-installation-guide/device-setup.md#using-the-battery) section for more details.
### Battery Life
Charging and discharging the battery will cause normal wear on the battery.
{% hint style="danger" %}
Li-Polymer and Li-Ion batteries must be recycled or disposed of properly as per local guidelines/regulations.
{% endhint %}
## Using the Smart Card Reader
Insert the smart card to proceed with the EMV transaction. EMV supports credit card and debit card transactions.
#### To Conduct a Smart Card Transaction
{% stepper %}
{% step %}
**Position the smart card**
Position the smart card with the contacts facing upward.
{% endstep %}
{% step %}
**Insert the card**
Insert the card into the reader slot in a smooth, continuous motion until it seats firmly.
{% endstep %}
{% step %}
**Wait for completion**
Wait for the application to indicate a completed transaction before removing the card. Premature card removal invalidates the transaction.
{% endstep %}
{% endstepper %}
## Using the Magnetic Card Reader
Use the magnetic stripe reader to perform credit and debit card transactions.
#### Using a Magnetic Card Reader - Debit or Credit Card Transaction
{% stepper %}
{% step %}
**Position the card**
Position the card with the magnetic stripe facing inwards.
{% endstep %}
{% step %}
**Insert the magnetic card**
To ensure a proper read of the magnetic swipe card, insert the magnetic card from the side of the device, as shown in the illustration below.
{% endstep %}
{% step %}
Swipe the card through the magnetic card reader.
{% endstep %}
{% endstepper %}
## CTLS Transaction
The V660p-1 supports contactless credit or debit card transactions. To perform a contactless transaction, gently tap the card or hold the card against the surface of the display.
## Wi-Fi/BT Support
The V660p-1 device includes an integrated WLAN RF transceiver for Wireless LAN systems with advanced power management, and an integrated radio transceiver for Bluetooth wireless systems.
### Bluetooth Support
Supports BR/EDR and LE.
### Wireless Transaction
The V660p-1 device supports wireless transactions.
{% hint style="danger" %}
Turn off or unplug the terminal when connecting or disconnecting the device to avoid device memory corruption and data loss.
{% endhint %}
## Camera/QR Code Reader
V660p-1 includes a dedicated rear 5MP camera that can be used to scan both Barcode and QR codes. Follow these steps to scan successfully:
* Open the app that requires barcode or QR code scanning.
* Position the scanner or camera over the barcode or QR code
* Align the code within the scanning area and hold the device steady
---
# Agent Instructions
This documentation is published with GitBook. GitBook is the documentation platform designed so that both humans and AI agents can read, navigate, and reason over technical content effectively. Learn more at gitbook.com.
## Querying This Documentation
If you need additional information that is not directly available in this page, you can query the documentation by asking a question.
Perform an HTTP GET request on the following URL with the `ask` and `goal` query parameters:
```
GET https://docs.verifone.com/hardware-products/hardware/android-devices/v660-series/v660p/v660p-installation-guide/device-setup.md?ask=&goal=
```
`ask` is the immediate question: it should be specific, self-contained, and written in natural language.
`goal` is what the user is ultimately trying to achieve, the reason they need the answer. Sharing it helps GitBook give you a better, more relevant answer. A goal is most helpful when it describes the outcome the user wants rather than restating the question. For example, with `ask=how do I create an API token`, a goal like `automate deployments from our CI pipeline` lets GitBook tailor the answer to that use case.
The response will contain a direct answer to the question and relevant excerpts and sources from the documentation.
Use this mechanism when the answer is not explicitly present in the current page, you need clarification or additional context, or you want to retrieve related documentation sections.