For the complete documentation index, see llms.txt. This page is also available as Markdown.

M424 Quick Installation Guide

This guide takes the M424/M440 from the box to its first transaction: fitting the SAM cards, connecting power and communications, attaching the privacy shield, and accepting a payment.

Before you begin, confirm you have all devices, cables, and accessories listed below.

What's in the Box

Cover
Item

M424 Terminal

Description

The payment terminal, with colour display, PIN pad, and contactless reader.

Cover
Item

Multiport Cable and Connection Box

Description

Carries power and communications to the terminal.

Cover
Item

Power Supply Unit

Description

Mains adapter that plugs into the connection box.

Cover
Item

Mounting Screw

Description

Secures the back cover once the cabling is in place.

Quick Setup Guide

1

Insert the SAM Cards

Open the back of the terminal and fit the SAM cards before connecting anything.

1

Remove the back cover

Turn the terminal face down and slide the back cover away from the terminal in the direction of the arrow.

2

Fit the SAM cards

Slide the SAM cards into the two slots revealed under the cover, as shown in the enlarged view: slot A is SAM 2 and slot B is SAM 1.

2

Connect Power and Communications

Cable the terminal, then close the back cover over the cable.

1

Connect the cable and power supply

Plug the multiport cable into the connector on the back of the terminal (A); the enlarged view (B) shows the connector fully seated. Connect the power supply to the connection box (C), then plug the power supply into a mains outlet.

2

Refit and secure the back cover

Slide the back cover back onto the terminal with the cable running through the cut-out (A), then secure it with the supplied screw (B).

3

Connect the Terminal to a Network

Connect the terminal wirelessly to your network router, or pair it with a mobile device over Bluetooth.

4

Fit the Privacy Shield

Assemble the privacy shield and seat it over the PIN pad.

1

Assemble the privacy shield

Fold both side panels of the privacy shield inward and push the tab into its slot until it engages.

2

Fit the shield to the terminal

Lower the assembled shield over the PIN pad and press it down on both sides until it seats.

5

Take a Payment

The terminal accepts magnetic stripe, chip, and contactless cards.

1

Swipe a magnetic stripe card

Swipe the card through the magnetic stripe reader on the right-hand side of the terminal.

2

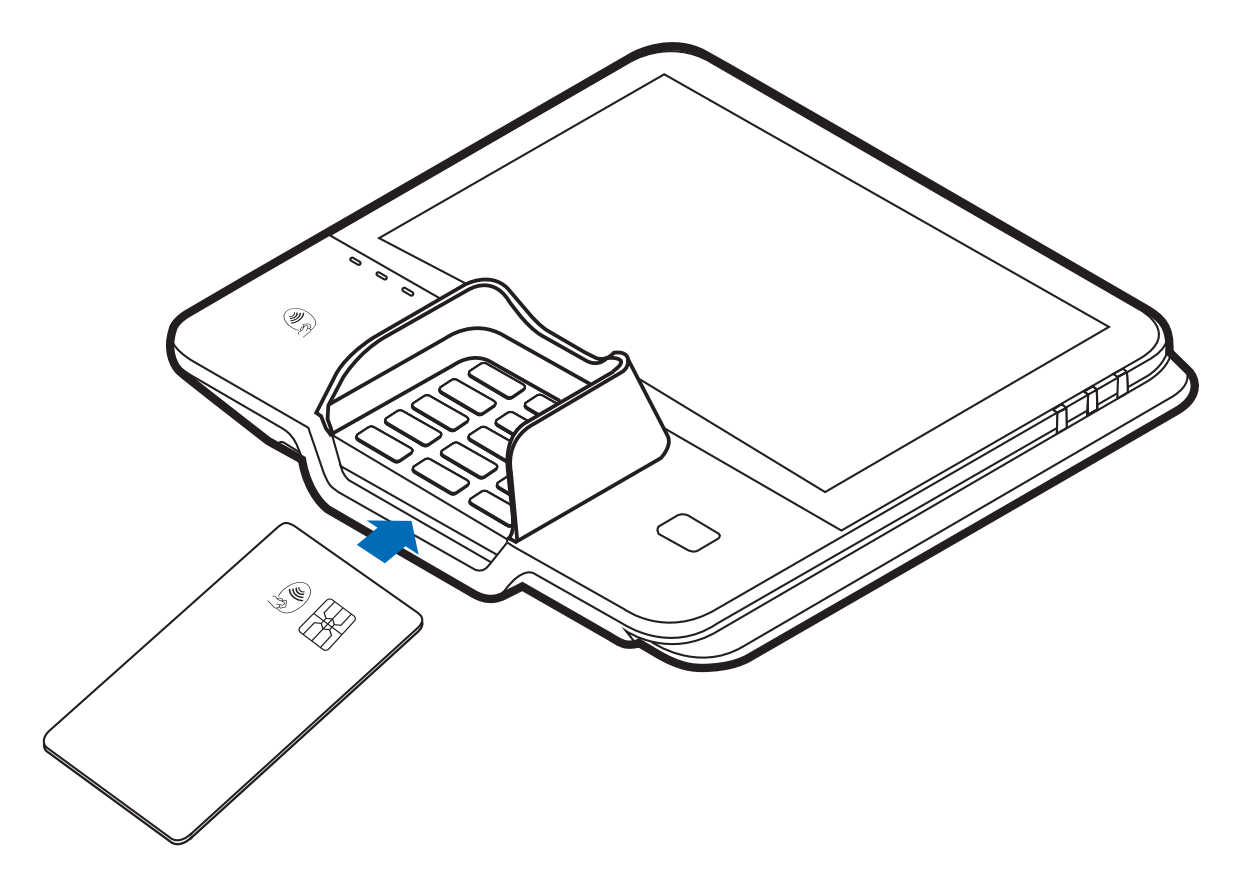
Insert a chip card

Insert the card chip first, face up, into the slot at the front of the terminal below the PIN pad.

3

Tap a contactless card

Hold the card flat over the contactless symbol above the PIN pad until the terminal reads it.

Full Installation Guide

For full device setup details, product information, and troubleshooting steps, refer to the M424 Installation Guide.

Last updated

Was this helpful?